baked desserts, Recipes jo hodson baked desserts, Recipes jo hodson

The Ultimate Healthiest Fluffiest Chocolate Cake Ever (probably!)

I'm a sucker for chocolate and I have a massive sweet tooth, hence the name of this blog, and whilst I've made plenty of chocolaty treats over the years... I hands down legitimately think this is the best of the lot!

I first made this cake towards the beginning of lockdown and ever since, I've been meaning to get it on the blog.

Today I have just made it for the seventh time (at least, I've lost count!) since I used a can of chickpeas last night, and so had the brine sitting in the fridge ready. So I figured I really must get this on the blog for you asap. Until now, I've been working with scribbled notes in my notepad the whole time.

I'm a sucker for chocolate and I have a massive sweet tooth, hence the name of this blog, and whilst I've made plenty of chocolaty treats over the years... I hands down legitimately think this is the best of the lot!

Yup seriously, I've made it almost every single week since the end of April.

Everyone I've shared it with (which to be fair is not that many because, er, lockdown!) has raved about it too.

As I have already implied, the magical ingredient to get a super springy, fluffy and moist crumb is aquafaba, aka chickpea juice! I also love this cake because unlike my chocolate banana brownie bread (which is amazing in it's own right) there is no banana flavour.

So, this one is for the pure chocolate junkies, put your hands up!

(Here’s proof from my phone archives of the multiples times its been made these last few weeks, and if you follow me on IG then you’ll likely have seen me mention it on my stories)

What makes it both healthy yet indulgent?

Well, I add in sweet potato (I have used carrot too, either is great) which assists with the moisture and texture, yet doesn't impart any noticeable flavour. Plus the bonus is that you get a boost of veggie goodness in the cake.

For the size of the cake, it's pretty low fat and relatively low sugar too. The sources of sugar I do use are unrefined versions.

Seriously... This is probably been my best lockdown creation. It does not taste in the last bit healthy.

So if you can't already tell, I'll just spell it out for you…

YOU. SHOULD. REALLY. MAKE. THIS. CAKE!!

There are a few things you may like to can try to change things up by the second, third… or tenth time you make it.

I really like pressing frozen fruits into the top, and then I like to warm it through and eat it as dessert. But equally, you can leave the fruit off and serve it at room temperature, or try adding nuts or chocolate chips.

Or if you want to go a little bit crazier, instead of the coconut sugar, you could use sugar-free jam to enhance the berry flavour, or why not add some orange juice and/or orange extract for choc-orange vibes.

This last time I made it today I added a little hazelnut extract and I wish I’d had some toasted hazelnuts or walnuts to hand to mix in, but alas I did not. But there’s another idea.

I don't measure ingredients exactly, so this cake is pretty foolproof. You don't need to be super precise - it’s always worked for me. I rarely measure things properly, i’m lazy in that respect and also pretty intuitive… I just seem to know what will work and 9/0 times it does :-)

I haven't tried gluten-free flours but I am pretty sure they'd be a fine as a direct swap. I personally like to use whole wheat spelt flour to add an extra healthier kick, not that you would notice this cake tastes super indulgent. You can also use regular white plain flour.

I like to use a deep brownie tin to bake it in, but you can also use 2 smaller shallower round cake tins or even big muffin cups. The recipe makes quite a sizeable cake so please ensure the pan is not too shallow. This cake will also freeze well if you don't plan to eat it all within a few days.

If you make it, please tag me on Instagram @johodson, I always love to see your creations.

healthy vegan chocolate cake - includingcake.jpg

Recipe: The Healthiest Fluffiest Chocolate Cake Ever (probably!)

Ingredients:

  • 1/2 cup aqua faba (chickpea juice is best but other beans work too)

  • 3/4 cup chopped dates

  • 3/4 cup worth of sweet potato

  • 1/2 cup coconut oil (or other mild oil of choice)

  • 1 cup milk of choice

  • 1 tbs apple cider vinegar

  • 1 tsp vanilla extract (or other flavours such as orange or hazelnut)

  • 1/2 cup coconut sugar (or another sweetener of choice, if using jam/syrup reduce other liquid slightly)

  • 2 cups flour (I use wholemeal spelt)

  • 1 cup cocoa

  • 2 tsp baking powder

  • 1 tsp baking powder

  • 1 /2 tsp salt

Method:

Whip up the aqua faba until it’s nice and frothy (note: I forgot to do this once and it still worked out fine so don’t worry if you forget this step). To a food processor add the dates, chunks of sweet potato and oil - blitz up until fairly smooth and no large pieces remain.

Spoon the mix into a bowl and add the remaining wet ingredients - apple cider vinegar, milk and vanilla extract and stir through well. Add all remaining dry ingredients and mix well. The mix should now be smooth and thick and ‘blob off’ the mixing spoon.

Line a deep brownie tin or other tin(s) or choice and spoon in the mix. Lightly smooth the top and press in frozen berries (use frozen so they don’t burn) or any toppings of choice.

Bake at 180ºC for approx 20-25 min until a skewer comes out clean.

Allow to cool before slicing and serving.

healthy vegan fluffy chocolate cake - includingcake.jpg
chocolate cake 5a.jpg

If you want to try some of my other chocolate creations… have a browse through these, there are all sorts in my archives!


ultimate healthy chocolate cake vegan.jpg
Read More

Summer Berry Crumble Bars

I made this oat crumble as a surprise 'bressert' for my boyfriend last weekend. His favourite fruit is rhubarb and I had a few stalks in the garden that I wanted to use up.  I wanted a super healthy breakfast crumble that was indulgent enough for dessert (hence bressert).

I had planned for this to be enough to last us for breakfast ABD dessert late in the day.... but we ate it all for breakfast.

I made this oat crumble as a surprise 'bressert' for my boyfriend last weekend. His favourite fruit is rhubarb and I had a few stalks in the garden that I wanted to use up.  I wanted a super healthy breakfast crumble that was indulgent enough for dessert (hence bressert).

I had planned for this to be enough to last us for breakfast AND dessert late in the day.... but we ate it all for breakfast ;-)

vegan berry oat crumble .jpg

I first made this oat crumble recipe for my 'Not Just For Goldilocks' book, so I won't share it in full right here, BUT I will share with you a great spin-off in the form of these bars. I made the bars in the photos below initially for Real Food Source last year and using the same principle as the crumble I made them again.

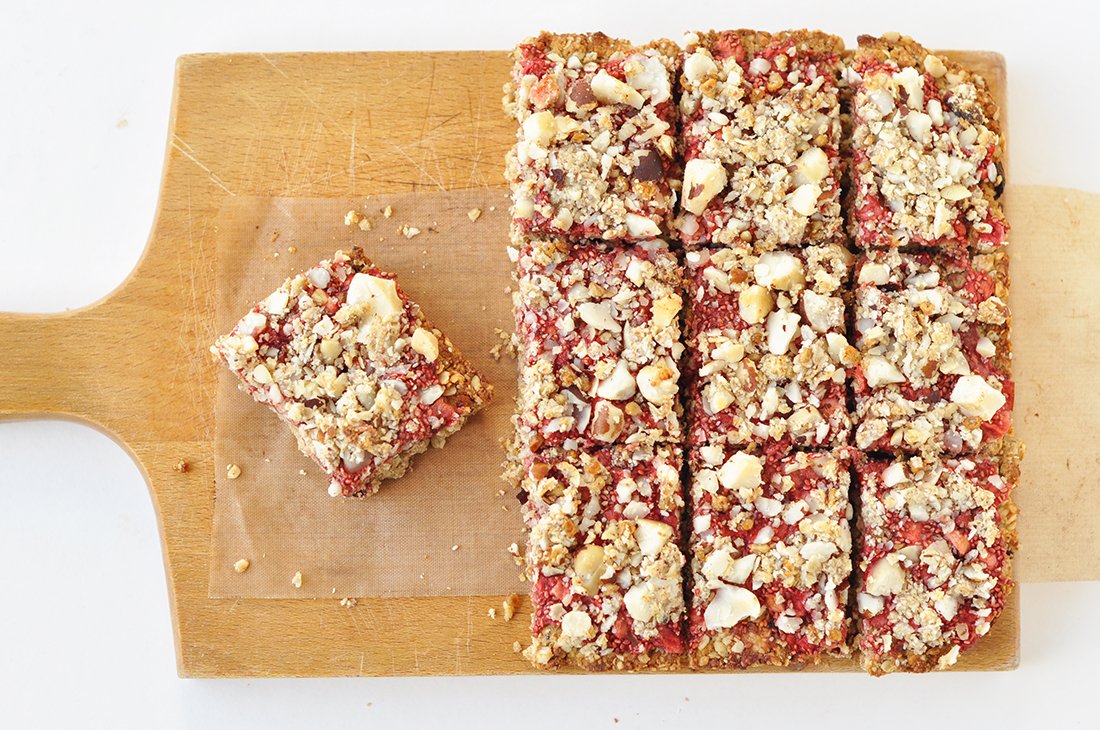
These bars are quite soft and cakey with a crisp top, which is how I love them. I used a combination of oats, ground almonds and tiger nut flour for the topping, but other flours in place of tiger nuts and almonds would also work.

They also have a great nutritional boost by way of chia seeds which are also used here to thicken and bind the base and fruit layer.

These are perfect served hot with some vegan for a little indulgence or with a dollop of plain vegan yoghurt for a breakfast option.

tiger nut crumble bars 3a.jpg

Recipe: Summer Berry Crumble Bars

Makes approx 12 squares

Ingredients:

Crumble:

  • 1 ½ cup oats

  • 1/2 cup ground almonds

  • 1 cup tiger nut flour (or other flour such as wholemeal, spelt or a gluten-free blend)

  • ½ cup coconut oil– melted

  • approx. 2 tbs coconut syrup (to taste)

  • 2 tbs chia seeds and 3 tbs warm water (mixed to gel)

Berry Layer:

  • 1 heaped cup stewed fruit (I used a combination of apple, rhubarb and raspberries)*

  • approx. 1 tbs maple syrup

  • 2 tbs chia seeds

  • ½ cup rough chopped nuts of choice for topping (optional)

*I used approx 2 small/medium apples, 2 medium stalks or rhubarb and a large handful of raspberries (I didn't measure precisely but it equated to a good cup of fruit once cooked down)

Method:

Mix the oats, ground almond and tiger nut flour dried with the melted coconut oil and syrup. Set aside approx. 1/4 of this mixture for the topping (or more for a thicker topping).

To the remaining mix, add the chia ‘gel’ to help bind. Press the crumble mix firmly into an 8” square pan- it should be approx 1cm deep.  Bake for approx 15 minutes at 180C until just golden.

Meahwhile stew the fruit in a saucepan, adding a little syrup to taste as the rhubarb and raspberries are tart. No extra liquid is required as the fruit will release it's own. Add the chia seeds during the last few minutes to help thicken.

Remove the base crumble from the oven and spread the fruit layer evenly over the top. Add the reserved crumble mix, plus extra chunky nuts if desired.

Bake for another 5 minutes or so until the topping is golden and the fruit bubbling.

Serve hot or cool (note: the bars slice better when cool)


tiger nut crumble bars 1a.jpg
Read More
bressert, no-bake treats, Recipes jo hodson bressert, no-bake treats, Recipes jo hodson

Strawberry shortcake parfaits

A super simple dessert...that you won't want to wait until the weekend to try!

This is also perfect for summer berries, though I am a little sad that the evenings are already getting shorter and it feels as though summer is already on it's way out. But it's ok because with a dessert like this you'll be able to hang onto that summer feeling for a little longer yet!

I found some Coyo coconut yoghurt in my local supermarket and was so excited to try it out. You could use any thick vegan yoghurt, or try this easy cheats version. You could also use other summer berries, though for me the word 'shortcake' is synonymous with strawberries so at least a few strawberries had to feature here! The shortcake layer is actually one of my favourite creations to date. You've previously seen it used here, but you could also use it as pie crust too I reckon (next on my list to try!). It is so easy and quick to crisp up too. 

Seriously, what are you waiting for!

Before I go... tell me, what is your favourite go-to summer dessert?

strawberry shortcake4a.jpg

Recipe: Strawberry shortcake parfait

Serves 2

Ingredients

  • 1 carton pain coyo (or ½ cup thick vegan yogurt)

  • 1 cup sliced strawberries (or a mix of summer berries)

Crumble:

  • 1/2 cup fine almond flour (not ground almonds)

  • 2 tbs agave syrup (or syrup of choice)

  • 1 tbs coconut oil

  • pinch salt

Method

To make the crumble, mix all ingredients together with you fingers until you have small ‘globs’. Spread on a baking sheet and grill the shortcake pieces for just a few minutes on a medium heat to lightly toast them- watch closely as they will quickly burn once they begin to crisp.

Place the shortcake pieces in the bottom of the serving bowls/glasses and top with berries, finishing with a layer of coconut (or other) yoghurt. Decorate with a few extra berries.

Mmmm... stick your spoon right to the bottom and get messy! The best way to eat summer parfaits!

Mmmm... stick your spoon right to the bottom and get messy! The best way to eat summer parfaits!

Toasted crumble goodness hot off the grill!

Toasted crumble goodness hot off the grill!

 I'd love you to join me in other places too!  

Why not sign up for my newsletter in my sidebar where I feature roundups and special offers  plus me FREE ebook. If you are new round here check out my 'About' and 'Getting Started' tabs up top. To buy nibbles you can also find me over at Wholeplus.  Day to day you can always find me in these places:


Read More
jo hodson jo hodson

Redcurrant coconut cream cheesecakes

I have so many more summer recipes I want to share while the sun in still high in the sky and warm on my skin for the next few weeks... I often make the mistake of having so many recipes I've experimented with and have actually run out of time to post them all whilst in season.

This simple recipe is something I whipped up for a Sunday dessert for my family a few weeks ago after a trip to my friends allotment to pick red currants because she had too many to eat herself. I picked a huge stash and have frozen a lot of them.

You could use other berries if you prefer - blueberries with some lemon zest would be amazing too!  But I love these little shining red berry jewels sitting on top of the creamy white 'cheesecake' topping.

So, onto the cheesecake itself... yep it's my super simple tofu free cheesecake blend made with coconut flour and non dairy yoghurt. It literally takes a couple of  to mix up and then some chill time. It's the same base that is used in these cheesecakes and also this cream (just at a different liquid ratio).  The coconutty flavour is very mild and works really well to compliment it. My dad (who doesn't really like coconut) enjoyed this cheesecake. 

I made these ahead ahead and stored in the freezer, allowing up to an hour to defrost before serving. If it's a little solid in the centre when you serve it thats still fine- kind of like ice cream! I find that its easier to remove from the pan when only slightly defrosted so that the side don't get mushed up as you remove it!

Recipe: Redcurrant coconut cream cheesecakes

Makes 4 muffins sized, 2 small or 1 medium cheesecakes (serves 4)

Ingredients:

  • 3/4 cup soy yoghurt (other yoghurts such as coconut would probably work well too)
  • 1/4 cup fine coconut flour
  • 1-2 tbs syrup of choice to taste
  • 1/2 tsp vanilla extract
  • 1/2 cup red currants (or other berries)

Base: I used some of my Wholeplus Squares mix, but you could use a similar 'bliss ball' style date and nut recipe' or this vanilla pie bites recipe.

Method:

Prepare base ingredients and set aside.

Combine all cheesecake ingredients in a small bowl and stir together well to from a thick paste. Set aside. 

Press the base mix in the bottom of 2 small or 1 medium pie dish- use either silicone or one with a removable base and then top with the cheesecake mix, flatten the mix with the back of a spoon and then press the red currants into it.

Freeze to firm up. You can prepare ahead and freeze for up to 1 month. Allow to defrost for up to 1 hour to serve (dependant upon size of pans used). Best removed from the pan whilst still fairly frozen.

I'd love you to join me in other places too!  

Why not sign up for my newsletter in my sidebar where I feature roundups and special offers  plus me FREE ebook. If you are new round here check out my 'About' and 'Getting Started' tabs up top. To buy nibbles you can also find me over at Wholeplus.  Day to day you can always find me in these places:

Read More
Recipes jo hodson Recipes jo hodson

5-minute fruit crumble!

It feels like I made this crumble ages ago, erm... actually I think that probably is the case!

crumble 4a.jpg

I've got so many recipes I want to share with you that have been stockpiling over the last couple of weeks as my creativity has continued full throttle but the practical reality of typing it all up on my computer to get it out there to the world has struggled a little more with so much going on in the background. Making decisions seem to take a lot of my time up- way too much procrastination going on recently!!

But all is good, there is plenty of time to enjoy the ride. Life is not for rushing. (maybe one day i'll follow my own advice).

So, back to the crumble.

This one literally takes five minutes.

It's healthy and gluten free.

There is absolutely no excuse not to make it!

So many of my recent recipes have been of the quick 5 to 10 minute type I think that's why I've created so many yet not blogged them, as in actual fact it takes longer to post them than it does to create them in the first place, crazy!

For this little dish I had just picked a big tub full of blackberries and so it was a no-brainer to team them with apple as it's my favourite summer-becomes-autumn fruit combo.

Fresh blackberries picked in the countryside near my house... thank goodness for Instagram to capture the loveliness! 

Fresh blackberries picked in the countryside near my house... thank goodness for Instagram to capture the loveliness! 

The almond flour made a great gluten-free topping, lightly crumbly and melt-in-your-mouth. it was a simple 'throw the ingredients into a bowl and clump up your fingers' type of deal and I cheated a little and grilled the topping instead of baked it for the super-speedy finish. It worked really well. 

So...who fancies a quick midweek desert? 

Enjoy.

crumble 5a.jpg

Recipe: 5-minute blackberry and apple crumble

serves 2 (or 1 hungry person)

ingredients:

fruity bit: 

  • 1/2 cup blackberries

  • 1 apple sliced fairly small (tart apples are best)

  • 1 tsp lemon juice

  • 1 tsp arrow root powder

topping:

  • 1/2 cup fine almond flour (not ground almonds)

  • 2 tbs agave syrup (or syrup of choice)

  • 1 tbs coconut oil

  • pinch salt

  • a touch of water (only if needed) 

Method:

For the fruit compote, toss the fruit in the lemon juice and arrow root powder and then cook on the hob to soften down- up to 5 mins.

Meanwhile combine the topping/base ingredients to form coarse crumbs/globs. Add a touch of water (if needed) to help the globs stick together a little.

Pile the hot fruit mixture into a small pie dish (approx 15cm diameter) and roughly crumble the topping on top- there should be some larger chunks. 

Grill on medium-high heat for a couple of minutes until the crumble topping begins to go golden- note it wont take long at all so keep a close eye! 

Alternatively if you want to go down the more traditional route of oven baking, you can cover with tin foil and bake for about 20 minutes until cooked, and then uncover and bake for a further 2 minutes to brown the top- but again keep a close eye! Note: i haven't tried it this way but suggestions I saw on the web followed this route. The foil prevents the almond flour browning prematurely.

crumble 2a.jpg
crumble 1a.jpg
Read More
jo hodson jo hodson

Sweet berry polenta

I haven't made polenta for a while, and when I have it's usually been of the savoury variety either as a mash potato type side or set firm and sliced into rounds as more of a bruschetta base. 

This time however I want to sweeten it up just a little so that it became more of a dessert like base as a summer breakfast, desert, or snack.

sweet polenta 4a.jpg

This is another versatile recipe that you could dress up however you wish with the simple notion that you whip up a batch of polenta as per usual but adding a little sweetness and spice to suit. I also added fresh raspberries to the mix and fresh blueberries on top by pressing them into the top of the mixture once i'd spread it out before chilling. Fresh berries are great here as the polenta is not baked so the sweet berries remain nice and juicy without risk of burning.... I usually use frozen berries if they are to be baked in this way.

Allow the dish to set in thin-ish layer (I used a brownie tin and flattened the mix with my fingers just under 1 cm thick) and then slice into squares or use a cookie cutter for pretty edges as I did. Once you have the top and bottom 'layers' you can add fruit, yoghurt, granola, nut butter, chocolate mousse....as you wish in between! The polenta layers remain soft and this suits more of a chilled desert since the layers are best served cold for firmness to hold their shape.

sweet polenta 3a.jpg

Recipe: Sweet berry polenta

serves 2-3  (4-6 slices depending on size)

Ingredients

  • 50g quick cook polenta
  • 200g water
  • 80g apple puree (or 1 mashed banana)
  • ¼ tsp stevia (or sweetener of choice to taste)
  • 2 handfulls of berries ( I used raspberries in the mix and blueberries on top)

Method

Cook the polenta with the water according to packet instructions- mine was quick cook and took 3 minutes stirring continuously. Once thickened add the fruit puree and stevia and mix well, add some of berries if you want a pretty coloured/textured mixture.

Using damp hands or a rolling pin roll the mixture to approx 1cm thick and press the remaining berries into the top.

Allow to chill and then cut into slices with a knife or cookie cutter and serve in layer with fillings of choice.

sweet polenta 2a.jpg
sweet polenta 1a.jpg
sweet polenta 6a.jpg
Read More
bressert, baked desserts, gluten free, breakfast jo hodson bressert, baked desserts, gluten free, breakfast jo hodson

Quinoa flake breakfast bake

I have never really baked with quinoa flakes before, mainly because I struggle to get hold of them around here. But a few a weeks ago when I visited Wholefoods on Kensington High Street in London for the very first time (much, much excitement) I picked up a bag.

So on Sunday morning when I was debating breakfast, I figured a little experimentation with my new purchase was in order! As it turned out, this little experiment became a rather yummy breakfast experience. This single serve breakfast bake will see you right through to lunch…and it’s so pretty too, the perfect start to your day. This could easily be served as dessert as well, maybe add a little more sweetness if serving as dessert as I was going for more of a ‘breakfast level’ sweetness with this bake and let the banana provide all the sweetness, other than a light drizzle of brown rice syrup on the top. You can use any summer berries you wish, I happened to have a few stranwberries to hand at the time. You could mix berries through the batter, but I would be careful not to make the batter too wet.

I mixed in a few oats with my quinoa flakes, but feel free to use all quinoa if you like (it may work with all oats as well but I haven’t tested this yet). The quinoa provides a lovely light texture in an otherwise moist and dense and bananary bread. Be sure to use a dish that allows the batter to be no more than 15mm thick as you may find it does not cook all the way through if much thicker.

I used a mini fluted ceramic pie dish (a recent new purchase that I was desperate to use for something!) and the bake was quite difficult to remove neatly. You can either it eat straight from the dish or make sure you use a greased/lined tin with a removable base which should make things much easier.

Recipe: Quinoa flake breakfast bake

serves 1

Ingredients

  • 1 large ripe banana- very well mashed
  • Agave to taste if necessary (I didn’t use any extra)
  • ½ cup quinoa flakes
  • ¼ cup oats- GF if needed (or more quinoa flakes)
  • ½ tsp baking powder
  • ½ tsp vanilla extract
  • ½ tsp cinnamon (optional)
  • ¼ cup chopped nuts of choice
  • Soy yoghurt to mix (I used approx. 3 tbs)
  • Handful of berries to decorate
  • Brown rice syrup/agave/maple syrup to drizzle

Method

Mix all ingredients (other than berries and drizzle) together in a small bowl adding the soy yoghurt last to achieve a thick smooth consistency. Spoon the mixture into a greased/lined mini pie dish  and decorate the top with the berries. Make sure the mixture is no more than roughly 1.5cm thick as it may not cook through properly.

Bake in a preheated oven at 180 for approx. 15 minutes until the top is lightly golden.

Whilst still warm drizzle with a little syrup and serve immediately.

Read More
no-bake treats jo hodson no-bake treats jo hodson

Valentine's Coconut Ice

Valentines is such a commercial holiday…but then again, any cause for celebration is good enough for me!

I’m not really the type to celebrate Valentines in a big way, I much prefer showing a little love at any other time of the year and not when I’m ‘told’ I should. But since I have no Valentine of my own it’s a little bit pointless debating my options (or maybe I’m just a tad jealous)!

A thoughtful gesture always means so much more than anything money can buy. A little homemade gift is sure to raise a smile... and a tasty yummy treat all the more!

I have a few simple Valentine’s ideas to post over the next few days.  These would be perfect any time of year….another little way to remind someone how much they mean to you.

No Valentine? Then treat yourself, you best friend or your mum. Plus since these treats are super healthy you will all be smiling all day long.

First up, pretty pink coconut ice. 

You can use any dried red berries here- I used cranberries but cherries would be fabulous! The result is a lovely speckled pink cube of delight with a light crumbly coconutty texture and hints of delicate sweet berries. You could use any shaped moulds you fancy, just make sure to firmly press in the mixture whilst still soft and warm.

Recipe: Valentine's Coconut Ice

Makes approx. 12 cubes (1 ice cube tray)

Ingredients

  • 1 cup coconut butter (make your own)
  • 2tbs cashew or almond butter
  • ½ cup dried cranberries or cherries
  • 2 tbs agave nectar plus tiny pinch stevia
  • 1 tsp vanilla extract

Method

Melt the coconut butter then combine all ingredients in a food processor and blend until a thick smooth paste is formed.  There should be ‘flecks’ of the red berries in the mixture as opposed to a solid colour. Whilst still warm, spoon the soft mixture into an ice cube tray or other candy moulds and press down firmly into each mould.

Freeze briefly to set and then store in the fridge.


Read More