

Cashew Cream
Sometimes the simplest things are the best.
This sure is a simple thing...
...Cashew cream!
I first tasted cashew cream in the style of a thick cashew yoghurt served with fruit as part of a buffet lunch at a recent ‘healthy Living’ Thermomix event. It was really good and a lovely change from my regular soy yoghurt. Once home, I was eager to whip up a batch for myself.
This recipe (if you can even call it that) is so simple and just requires a little bit of planning ahead to soak the cashews. It can be blended to various different thicknesses simply by varying the amount of water you use…yoghurt, thick cream, pouring cream or cashew milk (see note below). I have served mine here as a dessert with fruit but by changing up the spices you could make this into a sweet or savoury white sauce, serve thick on porridge or as a side to a slice of cake. How about topping it with granola ! (In case you are wondering I do still have the granola obsession- more flavour trials were going on in the kitchen this afternoon)
The steps below make a thick cream (think the thickness of regular double cream) and I served this in a glass (no small bowls to hand at the time!) with some chunks of fresh pear and pomegranate seeds sprinkled with cinnamon. The perfect creamy, light and fruity breakfast or dessert.

Recipe: Cashew Cream
Makes 600 to 650 g thick cashew cream.
Ingredients
- 250 g cashews (soaked in water for min. 4 hours, then drained well)
- 250 g water for blending
- ½ to 1 tsp real vanilla extract or vanilla bean paste or 1 cm fresh or dried vanilla pod
- 1 pinch salt
- 1 to 2 tsp agave syrup
- ¼ cinnamon or other spice- optional
Method
Drain cashews and discard the soaking water. Blend cashews with remaining ingredients in a powerful blender (I used my Thermomix) for approx.. 1 minute until smooth.
Taste and add more flavourings if desired then blend again for a few seconds.
Note: For a really thick Cashew 'Yoghurt' add between 50-100g water. For a pouring Cashew Cream similar to single cream use 500g water for blending. For Cashew Milk, use 750 g water for blending. Adjust flavourings as necessary. If making a milk you may want to strain the liquid through a nut bag so that it is absolutely smooth.


Date syrup and paste
This is a little quickie recipe…if you can even call it a recipe! My toffee granola bars posted last week and also my sticky toffee pudding called for using date syrup, and since it is so easy to make your own I thought I’d share a post dedicated to it.

Dates also have many nutritional benefits, particularly when compared with many other sweeteners and are also very popular with raw foodists. Without going into great detail here; dates are a rich source of dietary fibre, iron and a number of minerals, and are also very rich in antioxidant flavonoids offering protection to the cells in the body. For me the biggest reason to use them- they are a wholefood form of sweetener.
I use a lot of dates, particular in their raw form in my smoosh bar varieties, so I have bought a large box in bulk making for an economical syrup. I use organic deglet noor dates, but either deglet noor or medjoul dates (which are larger and slightly more juicy) should work fine. Medjoul may even be preferable but since I haven’t yet tried using these dates I cannot confirm this.
You can either make a date paste or a syrup simply depending on how much water you add. Paste like syrups work better at binding things together whereas a looser syrup works best to spoon over or mix through- i.e spooning over the sticky toffee pudding…Mmmmm!
Since dates naturally have a caramelly, toffee like flavour they make the perfect sweetener for a toffee or caramel flavoured dessert, this can be enhanced with other sweeteners such as brown rice syrup when a very sweet caramelly flavour is required in a desert, but on their own they provide a lovely subtle sweetness. I also add a touch of vanilla extract to the syrup to subtly enhance the flavour, but other flavours or spices could be used too.
The date syrup pictured used 1 cup of water.

Recipe: date paste/syrup
Ingredients
- 1 heaped cup of dates (I used 1 heaped cup to compensate for the fact the dates were whole and not packed in- so you want to visually aim for a fairly packed cup)
- ½ cup hot water-
- for a thick paste
- 1 cup hot water-
- for a thick syrup ( used this for my granola bars)
- 1.5 cups hot water
- - for a smoother easily spoon-able syrup
- 1 tsp vanilla extract- optional
Method
Place the dates in a small/medium bowl. Pour the required amount of boiling water over the dates and leave to soften for approx. 30 minutes. Once softened pour the contents of the bowl, along with a little vanilla extract, in to a blender (I used my thermomix) and blend until smooth.
Pour the syrup into a jar and store in the fridge if not using straight away. This keeps for at least two weeks in sealed container.
Note: the more water used the more 'dilute' the dates become and therefore less sweet the syrup. If you are afer a sweet syrup you may like to add a little stevia or brown rice syrup also.

‘Twelve Days’ day 7: Mincemeat- simple and sugar-free!
When I pulled open my blind this morning I realised we’d had our first snow! Ok, so it wasn’t really much to write home about and wasn’t particularly photo worthy either…but it was still snow! Wohoo!
It now feels much more like winter, a little boost to the Christmassy spirit!
So far this year it’s been very mild outside, I’ve barely had to scrape my car at all in the mornings before heading off to work but in the last week or so there has definitely been a winter chill in the air and snowfall was only a matter of time.
Time, to cosy up indoors with snuggly slippers a dressing gown and maybe a glass of mulled wine? No… I’m saving that for Christmas! A mug of herbal tea with have to do.
It’s time like this I really wish I had a crackling fire to sit next to as I write…no such luck, although the glow of the tree lights is nice. Actually an open fire would probably be a bad thing…I’d fall asleep in no time!
In all the talk of warmth and spices, Christmas is not complete without mincemeat….. Oh no, I can see some of you pulling a face…stop and re-consider. I’ve never really liked mincemeat, it always seemed full of too many currants, mixed peel and things like that and for someone who previously disliked dried fruit it just wasn’t my thing.
I’d never even considered making my own and certainly not realised how simple it really can be! Now I'm brimming with ideas using this basic concept...for example a 'summer fruits' or 'tropical' version for summer time- who says mincemeat is for Christmas only?
It's simple…pick the dried fruits you like (ok so ideally there should be some sort raisin/sultana combo going on but you can add other things too) blitz together and you’re done. No cooking, no sugar, not fat and no mess. This will easily store in a jar for a few weeks and freezes well too….so make it now to see you through the holidays.
As noted above this recipe is fat free and sugar free….it’s just pure and simple and needs nothing more. The dates along with the other fruits give it all the sweetness it needs.
I have a couple of mincemeat recipes coming up. I had planned on including the first recipe as part of this post, however the daylight faded before I’d finished in the kitchen so the photoshoot will have to take place tomorrow with recipe to follow.

Recipe: Mincemeat
Makes approx. 2 ½ cup
Ingredients
- 1 cup raisins
- 1 cup dried cranberries (I used the sweetened variety since I could not find unsweetened at the time)
- 1 cup sultanas
- ½ cup coarsely ground dates
- ½ cup whole blanched almonds
- 2 small to medium apples
- grated rind of one orange
- grated rind of one lemon
- 1 tbs arrowroot/tapioca flour (or any fine flour) optional
- 1 tsp cinnamon
- ½ tsp mixed spice or nutmeg
- 1 tsp rum extract (optional- I did not include this as it tasted great without)
Method
Peel and core the apples and chop into quarters. Chop the dates in a food processor to get a course meal. Add all the ingredients and process until you have a sticky chunky mixture. I added a tbs of arrowroot to absorb a little of the liquid and help bind the mix together but this is not a necessity.
When I tasted the mixture I felt it really didn’t need the rum extract but feel free to add some at the end before a final whizz if you fancy. You could also include actual rum or brandy but again I didn’t feel it needed it and it would also have changed the consistency of the mixture.

Struggling With Life
Ok, I’ll be honest… these last few days have been hard. Everything is ‘up in the air’ and change is all around me right now.
Why?
The ‘Boy’ who has played a major guiding role in opening my eyes and redirecting my life over this past year, is no longer my boy. It was a mutual decision to call it a day.
Food was always such a big part of our life together and I gained so much happiness in creating recipes for us to try and then seeing the joy on his face when I’d succeeded. For these last few days food has been the last thing on my mind. In actual fact, even if I’d wanted to get stuck into something I haven’t been able to since all my baking ingredients have only just moved out with me and are yet to be unpacked. The previous post on ‘peanut soup’ was a recently written back-up post that I kept in reserve for an emergency situation (this counts as an emergency-right?)
It all just feels a little surreal at the moment, I guess my ‘reason’ for doing what I do suddenly seems somewhat meaningless when you’re not ‘in it together’. In the beginning the Boy gave me a reason for it all, the meals we shared together the naughty but healthy snacks I could make him, to nurture and look after him. He was a willing participant and allowed my happiness and skills to grow. That meaning is now gone. My curiosity is still there, but I feel resentment and discord… why try and make the effort when there is no one else to really appreciate the outcomes? It just feels empty.
Oh poor me…sob sob sob! NO!
On a more serious note I know it will all be fine, this is far from a ‘sob story’ and I am not one to to dwell and mope for long. I am only writing about this to give you a greater understanding as to why there might be a few changes around here as I find my way on my own… or should I say on my own terms… it’s all down to me now!
So I guess I just need to suck it up and get a grip!!
I know it will settle in time and that I’ll have my ups and down just like the everyone else, I also know that I’ll find a new way to re-create this meaning in my life and for the people around me, and hopefully find more people like me and maybe enlighten a few of those closer to home. Most importantly I know full well that in order to have healthy treats I’ll have to make them myself… a life without treats… no thank you!!
So, you see I can’t just stop even if I wanted to!! Just watch this space…..
My crazy Halloween pumpkin 'babies'
It hasn’t bypassed my attention that Halloween is just around the corner!
Blog-land has been full of pumpkin recipes to make your mouth water for weeks, but I have yet to join in the fun. Don’t worry I have been keenly following all the developments and will be making my own pumpkin scones to share with my work colleagues on Halloween itself. I know this won’t be in time for you to have a go at making them in time for Halloween, but with all the ‘scary’ cake ideas already out there to choose from I figured this wouldn’t necessarily be a bad thing. Pumpkin and squash will be in season for a while now so plenty of time to make these scones in the weeks to come. Plus what I have put together for you below will surely raise a little smile and make up for the lack……?
In previous years I have taken part in a pumpkin carving competition with work colleagues. It’s just a bit of fun amongst the team but it probably goes without saying that I do have a tendency to get just a little competitive!
A traditional carving- oh no, not for me! But this is actually pretty simple and easily customisable- one pumpkin, a bag of satsumas and some embellishments and you're already halfway there!
Enjoy!

(p.s what crazy pumpkin creations have you made for Halloween?)
Why not sign up for my newsletter in my sidebar where you get blog post round ups plus other goodies (such as special offers, challenges and collaborations) right there in your inbox!
Day to day you can always find me hanging out in these places:
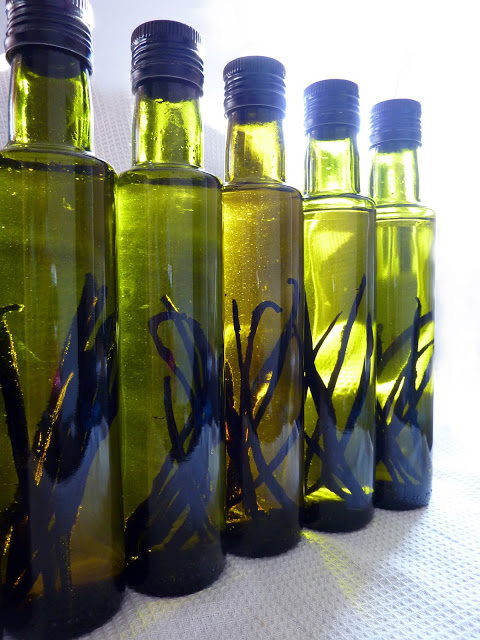
Vanilla extract (prepare it now for xmas!)
When it comes to the flavours and spices in my baking, I have a few favourites (other than chocolate!!) cinnamon, ginger and vanilla are my top three, they also happen to team up well with chocolate…..
It occurred to me a few weeks back that I get through a lot of vanilla, and for good quality (I use Nielsen-Massey) it gets pretty expensive. Hmmm, I wonder if I could make my own?
Subsequent investigations revealed that yes indeed I could, and actually it’s pretty cheap and simple to do. The instructions I have listed below are quite paired back and are the summary of my findings as a quick-fire user friendly set of instructions to follow as you go. I did however review a variety of sources in putting these together. This is the best resource I found giving much more in depth background information, and also here is another recipe resource you may also find as a useful guide.
All the reviews indicated that the extract would be ready to use after about 8 weeks, and that it would continue to infuse for the months to follow. Quick… make some up now and you’ll have fab little Christmas gifts for the foodies in your life!!

Recipe: Home-made vanilla extract
Ingredients
- 35-40% rum or vodka
- Vanilla beans
That is it!
I am making a few bottles each of rum and vodka for a taste comparison. I purchased six empty 250ml bottles or the vanilla and one 70CL bottle each of rum and vodka- thus three small bottles of each type of extract. (perfect pressie options… unless I keep them all to myself!) I used approx. 50 vanilla beans all together- Ebay have some great deals in organic beans. I used cheap alcohol varieties as my consensus (and the consensus of my integrate searches) was that once fully infused the extract will dominate any of the original alcohol flavouring.
Method
Sterilise all equipment prior to use with boiling water.
Use approx. 8 vanilla beans for each 250ml bottle of extract. Cut each of the beans in half exposing the 'caviar' in the middle. Some guides suggested scraping out the caviar to get a greater surface area when it is all added to the bottle, however I felt that this wasn’t necessary as there was still a lot of exposed surface area once the bean was slit and it seemed like unnecessary mess (I usually love a good bit of mess but had wastage!) Fill the bottle(s) evenly with the split beans and then add the alcohol of choice. Secure the lid (I used a screw top with a pourer) then give a good shake, keep shaking… shaking…. Shaking!!
Shake once a day for about a week and then a few times a week thereafter for 8-12 weeks until ready.
I can’t wait to take a good sniff of the stuff once its begun to deeply infuse… oooh the anticipation.
Why not sign up for my newsletter in my sidebar where you get blog post round ups plus other goodies (such as special offers, challenges and collaborations) right there in your inbox!
Day to day you can always find me hanging out in these places:
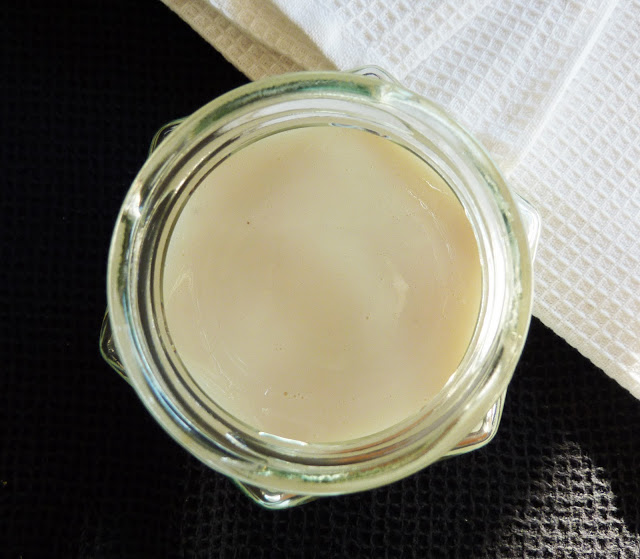
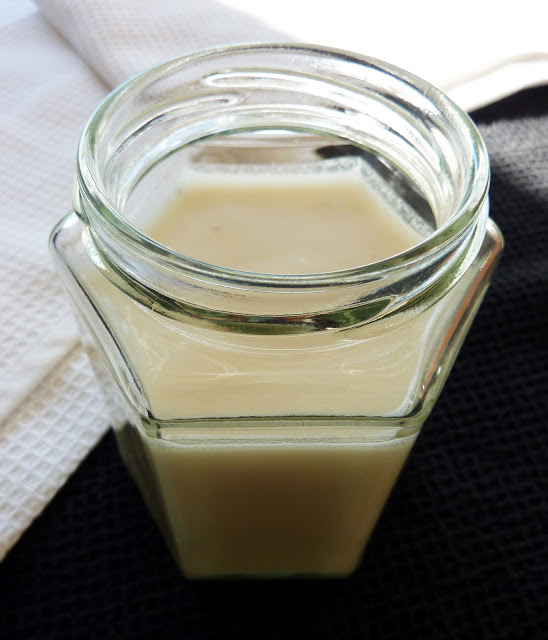
Homemade Coconut Butter
In many of my recipes I use coconut oil or coconut butter. This is the healthiest type of oil (particular if organic, cold pressed and raw). Coconut butter is rich with lauric acid; a medium-chain fatty acid. Medium chain-fatty acids differ from long chain fatty acids, found in animal fats. They are small, absorbed directly by the liver and convert quickly into energy; unlike long-chain fatty acids that are deposited in fat cells and convert much more slowly. The white meat of the coconut is also packed with fiber, protein, vitamins B1, B6, C and E, folic acid, calcium and iron.
For more info on the health benefits of coconut oil see here, where there are various links for reference.
The only downside to coconut oil is that it tends to be so expensive at around £10 (or more) for a 450g tub. Coconut butter on the other hand can be very cost effective due to the fact that it is very simple to make your own as long as you have a high powered blender.
Coconut oil and butter are not the same thing and they are not always directly interchangeable. Coconut oil is the pure ‘oil’ with no flesh, whereas coconut butter is the oil and the flesh combined (approx. 70% oil and 30% flesh) so the resulting product when melted in its usable form is much thicker- think yoghurt or thick cream consistency- and opaque compared with the clear very runny oil.
When it comes to baking I have tried countless combinations and substitutions using coconut butter and often it does the trick, however there are times when the butter just won’t do and a very runny oil is needed, see this cookie recipe to get a better understanding in context. Coconut butter works best when used in place of ‘softened butter’ or ‘shortening’ i.e when you are not relying on the runniness of oil to combine ingredients into a dough, and other liquid ingredients are also used. To get a really ‘crisp’ cookie where oil is the primary liquid then don’t skimp on using pure oil!
So, to make your own coconut butter, it is really so simple it barely needs a recipe but I’ve added one for completeness!
Recipe: Coconut butter
Ingredients
200g-500g Organic dessicated coconut (unsweetened and not defatted- just the usual stuff bagged up in health food stores/supermarkets. Use an amount appropriate to the size of blender- don’t use too little as the volume reduces a lot when it liquefies and I find in my Thermomix that it is more difficult to work with a small amount as it just flings itself to the side of the jug.
That’s it!! You just need coconut!
Method
The key here is to keep blending beyond the point you think it’s finished- I made this mistake the first time I tried as even though it looked ‘ready’ it still had a fairly grainy consistency. In my Thermomix I use 500g of desiccated coconut and blend this at high speed for 3 ½ minutes- stopping a couple of times to scrape down the sides of the bowl. My machine also has an independent temperature setting which I set at 37 degrees to help release the oils a little better. The temperature is by no means a necessity but it may simply take a little longer to blend. Taste test after 3 ½ minutes and keep going until you have the consistency of thick cream and no graininess.
Once ready it should pour smoothly and effortlessly in a jar where it can be stored in the cupboard for use. I’d advise against storing this in the fridge as it will go very hard and will be more difficult to use. At room temperature coconut butter is typically solid but on a hot day it will liquefy, this is absolutely fine and in no way degrades the butter, it will solidify again when the temperature drops.
Why not sign up for my newsletter in my sidebar where you get blog post round ups plus other goodies (such as special offers, challenges and collaborations) right there in your inbox!
Day to day you can always find me hanging out in these places:
Squirrelling
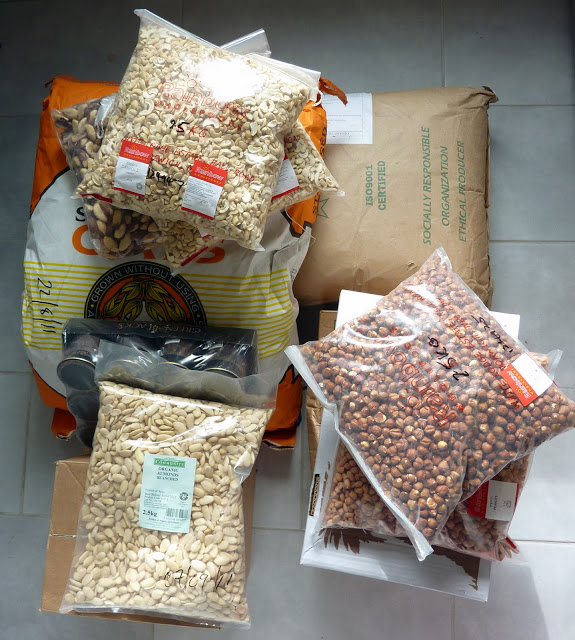
I’m building up my nut stores for the long winter months ahead!
Well, not quite, but I have ordered quite a ridiculous amount of nuts this week (along with cocoa powder and oats). I think I may have got a little carried away whilst placing my order over the phone as I had most definitely not anticipated that my goods would be delivered on a palette! They arrived early in the morning and although I had already been up for a couple of hours I had yet to get changed out of my jim jams and dressing gown (schlompy morning sat at the computer). Goodness knows what the neighbours thought as I carried in my nuts from the driveway.
So, much excitement and experimentation on the cards in coming weeks- I will be making my own coconut butter, nut butters and pestos as well as almond flour, particularly for use in my gluten free recipes. I had decided it was time to order in bulk as nuts are so expensive by other means, but now I just need to be careful in storing everything to ensure they don’t turn rancid.
I don’t think the picture below quite does it all justice… it really was a big pile!! The two big sacks are 25kg bags! I still haven’t found a home for everything…..
I am a designer, personal empowerment coach and writer from the UK. I work with health and wellness businesses to bring their mission and purpose to the world. I also help people become the best version of themselves in mind and body.
Sign up here for my content delivered to your inbox and get access to my free resources.
Day to day you can always find me hanging out here:
Instagram ✨ Facebook ✨ Pinterest