

Green beans, radishes... and Soul Circus!
Last weekend I had the privileged of working at Soul Circus, as taken from their website...
"Let your body dance and your soul run free. Soul Circus is about shedding the constraints of your adult life and rediscovering the world through the eyes of your inner child. Fun. Fantastical. Free. We invite you to participate in a weekend of celebrating and rediscovering your true self."


After a week of beautiful weather, it rained almost all weekend. I'm not going to lie... it would have been amazing if we could have enjoyed sunshine, chilling out on the hay bales, soaking up the sun, sipping green juices, chatting, jamming, playing... but instead we spend most of it ducking under cover! The sun did make an appearance in Sunday and so we all made the most of that!
Luckily, all the yoga sessions were held under cover the paver of beautiful tents, and I went to as many sessions as I could... plus a sound bath (cos I love them!) and a pineal light therapy session. My favourite by far was the handstand yogis session led by these guys.
The attention to detail at this festival was incredible, maybe it's my years as an architect but I have an eye for that kind of thing and it did not go unappreciated. The bright colours of the ribbons and bunting brought such life, colour and beauty to the rainy greyness that prevailed.

On two evenings I helped out back of house in the kitchens, on the first night we prepared six course vegan dinner for 40 guests led by Jay Halford at The Core Cheltenham and then on the second evening I assisted a dinner for 12 VIP's in a makeshift back stage kitchen! Chris the chef, gifted me lots of lovely organic veg that was leftover... I received a bag of cobnuts, beautiful red and golden beets and a bunch of radishes and fresh herbs.
I have only even eaten radishes raw before and so I was intrigued to pan fry them. I had loads of green beans ready in the garden so this simply dish came together nice and easily.
If you haven't tried cooking radishes before, I highly recommend it... lovely mellow and almost buttery flavour. I used coconut oil but you could use an alternative favourite.

Recipe: Green beans and radishes
Ingredients:
- 2 handfuls green beans- ends trimmed and beans cut in half
- 1 small red onion (or 2 shallots)- sliced thinly
- 1 handful radishes- halved or quartered
- 2 tbs coconut oil
- 2 garlic clives- crushed
- 1 tsp mixed Italian herbs
- small handful of fresh parsley or rosemary- chopped
- red chilli pepper flakes to serve- optional
Method:
Boil the green beans for 5 mins.
Meanwhile prepare remaining ingredients and add to a large frying pan with the coconut oil.
Drain and add the green beans. Pan fry all together until the radishes are lightly golden. Add the fresh herbs and stir through to serve. Sprinkle a few red pepper flakes over the top if desired and add salt and pepper to taste.


P.s There is an early bird rate coming soon for next years Soul Circus festival... so keep an eye their website for more details.
High protein pizza base... in minutes!
I never really worry much about getting protein on a vegan diet as my focus on real whole foods of maximum variety typically does that by default, but it is nice to know that it's easy to put together a high-protein meal when needed- particularly something like this pizza when the base itself gives a great protein boost and you can top it up with anything you like knowing that I've got a well balanced meal in the bag!
In addition it's always nice to have an answer to the question 'where do you get your protein?' and also offer a simple option for those who are looking for high-protein veggie-based meals.
oh and did I say... Pizza?
Yay, pizza :-)
The pizza base contains just three ingredients- quinoa, almonds and flax (plus any herbs if you wish to add them). Each ingredient is in itself a great source of protein, amongst other nutrients, Plus it couldn't be easier to make in minutes. Such a winner!
You can top the base with anything you like, I'm not a fan of fake vegan cheeses so I used home-made hummus mixed with tomato purée and then just any veggies I had to hand. This base also freezes beautifully as I have now done on multiple occasions since I first created the recipe. It makes for an amazingly speedy last minute dinner!

Recipe: High protein pizza base
Serves 2
Ingredients:
1 cup cooked quinoa
½ cup ground almonds
2 tbs flax
1-2 tsp mixed herbs (optional)
½ tsp salt
Pizza topping:
1 tbs tomato puree
2 tbs hummus
1 cup worth finely chopped veggies of choice- tomato, onion, bell pepper, courgette and sweeetcorn work well.
Method:
Process all ingredients together until you have a well blended slightly sticky dough. It should still be easy enough to handle and roll. I found it didn’t stick to my rolling pin at all but if this is a problem for you that’s the running pin with a little dry ‘flour’ of some kind- such as fine almond flour or protein powder. Attentively press out into pizza bases with your hands.
Once you have rolled the dough to approximately 3-4mm thick, bake at 180C for 10-15 minutes until sealed then flip over and bake for a further 10 minutes until just beginning to turn golden.
You can remove from the oven and allowed to cool and then freeze at this point or simply add all your pizza toppings and bake for 10 minutes until cooked and golden.


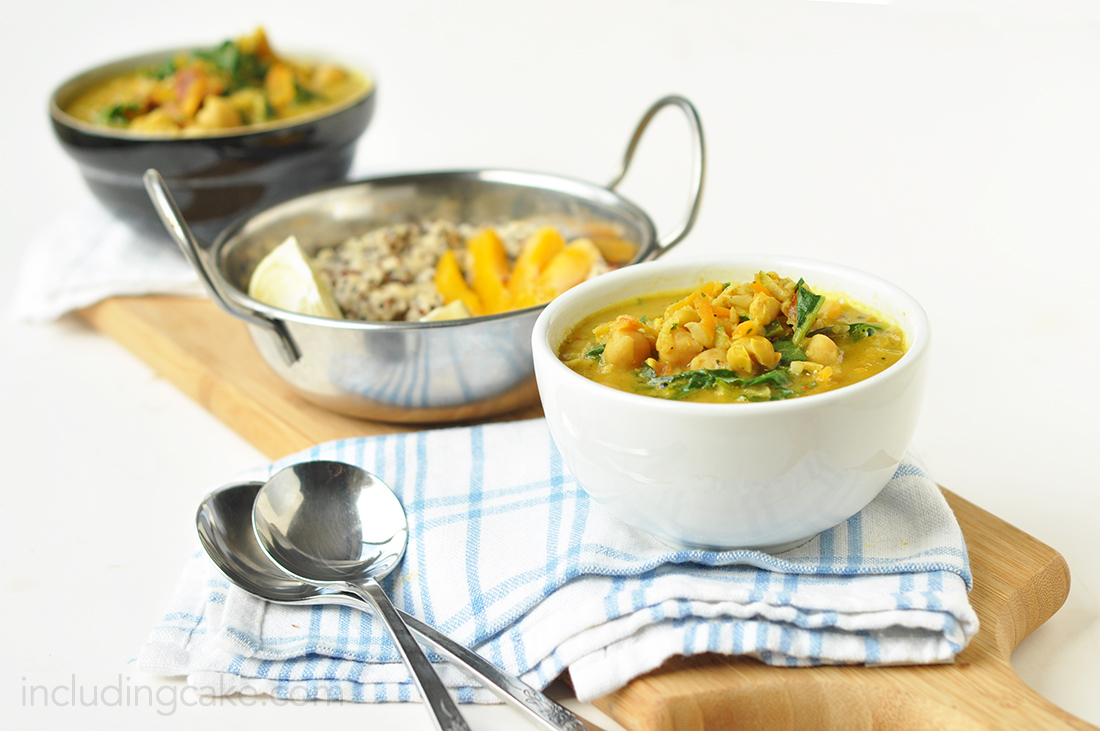


Cauliflower 'Cheese'.... fat free!
This is the recipe that has got me most excited in recent weeks!!
…And this is why!
...it’s quick to whip up, it uses two basic cheap ingredients, it freezes well, it’s so versatile as a sauce in so many recipes or even as a stand alone dip!
This would make a perfect ‘lightened up’ pasta bake or really anything that would use a regular cheese sauce. I made cauliflower cheese because to me that’s classic comfort food and it’s what I craved. You could add other vegetables or substitute the beans for the peas. I had some beans needing using up so I added them for extra protein and texture.
I can’t take full credit for the 'cheese' sauce as it has appeared in various guises around the Internet, and I tweaked this spices and removed the oil to make it my own.
I want to point out, that you could add some fat (see this recipe which was my main inspiration) and but I wanted to see what the texture was like without. Also, I prefer adding the fat component of a meal by way of ingredients such as nuts and avocados as opposed to adding unnecessary oils into sauces etc. That is simply my preference.

Recipe: Cauliflower cheese
Serves 2
Ingredients- Sauce:
2 small fist sized white potatoes- chopped on to smallish pieces (approx 350g)
1 heaped cup chopped carrot (approx 150g)
1/2 cup water
1 tsp salt
juice of half a lemon
1/2 cup nutritional yeast*
2 garlic cloves
1 tsp wholegrain mustard
Other ingredients:
1 head of cauliflower
1 courgette
1 can white beans (or beans of choice or peas)
Method:
Boil the chopped carrots and the potato for 15 to 20 minutes until soft. (I used a food processor for the carrots and potatoes and then only cooked them for five minutes or so).
Meanwhile mix the rest of the sauce ingredients together in a small bowl.
Chop the cauliflower and courgette into smallish pieces and lay evenly in a medium sized glass oven dish.
Once the carrot and potato have cooked, transfer to a blender/food processor and add the remaining ingredients. I found the veg retained some cooking water, so add only a little extra water to start with as you do not want the sauce to be too runny, add extra if needed.
Pour the sauce into the oven dish to fully coat the veggies. Bake at 180C for about 20 minutes until the top is golden and the veg cooked through.. Serve immediately with a side salad if desired.
*Do not skip or substitute the nutritional yeast, this is what gives the sauce it's cheesy flavour. I use this brand and it can be found in most whole food stores in the UK and online. It's a good store cupboard ingredient to have on hand for dairy free cooking!


Why not sign up for my newsletter in my sidebar where I feature roundups and special offers plus my FREE ebook. If you are new round here you might like to check out my 'About' tab up top. To buy healthy nibbles you can also find me over at my sister site Wholeplus.
Day to day you can always find me hanging out in these places:
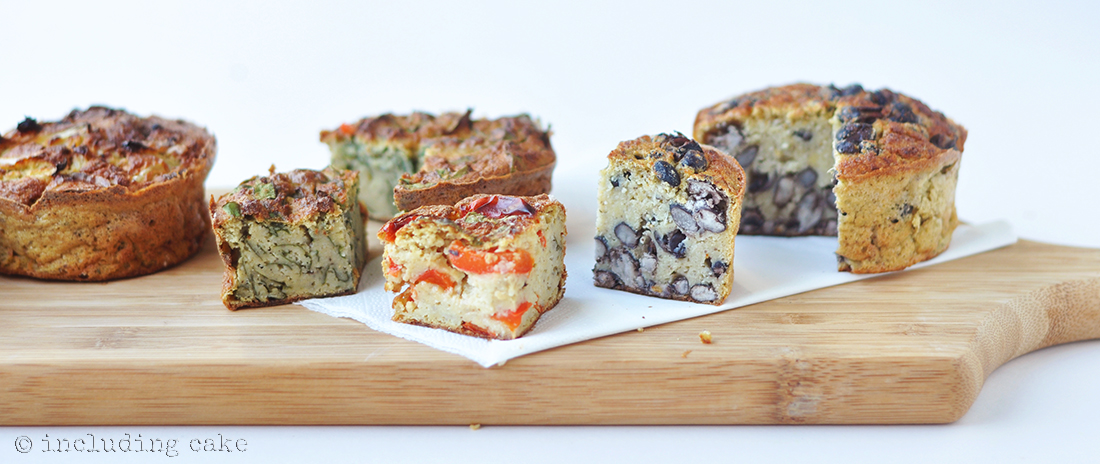
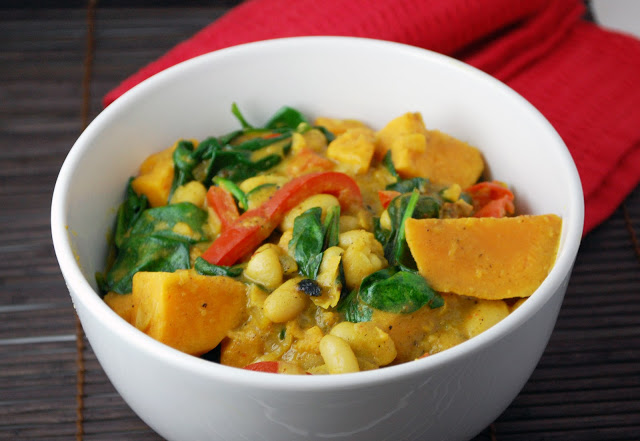
The most versatile vegan quiche... four ways!
Wow... I owe you a recipe!! Yeah this was once a recipe blog ;-)
I have so many recipes I want to share, and even more than I want to test out... but I have so many other things I ask want to share and only so many hours in the day to do it all! Plus Wholeplus to manage on top of all that!
I hope this makes up for it! It was one of my favourites versatile creations during December. A spin off from this recipe that I knew at the time held so much more potential, and so it is that 'potential' I want to share with you today. I also featured festive variation using parsnip instead of cauliflower in my column in Definition Magazine in the November issue last year... yummy!
This recipe is also perfect for this time of year. Comforting yet light and tummy friendly, and perfect for a lunch or dinner. Packed with protein but without weighing you down... Winner!
When it comes to recipes, you surely know how high ease and versatility rate on my scale of importance by now! This does not disappoint... I promise! (even though the method looks longer than usual... it is really simple!!
I've called it a quiche, thought I guess it's not really in that it doesn't have a crust or use eggs, it's also lighter than a quiche with the chickpea/cauli infusion going on. It's definitely not a pie or fritatta either...so what else would I call it? Quiche is definitely the closest.

I've provided the base recipe below and all the addition options beneath. These are my flavours...but try experimenting with whatever takes your fancy or you happen to have to hand. You'll see in these photos I made single serve size quiches in jumbo muffin cups. They worked really well. You could make a big batch to freeze!

Recipe: The most versatile vegan quiche
Make 1 x 8” pie dish or 3-4 single serve jumbo muffin sized
Basic ingredients:
1 cup chickpea flour
1 tbs flax
½ tsp salt
½ tsp general mixed seasoning
½ tsp baking powder
¼ tsp baking soda
half a head of a small-med cauliflower (equal to 1 cup grated)
½ a onion sliced thinly
1 cup water
Options- add one of these (or more than one if making mini quiches):
1/2 cup black beans (I teamed this with a smoky chipotle sauce and nutritional yeast)
1/2 cup corn and sliced red onion (I used frozen corn and added paprika)
1/2 cup sliced red pepper and sun dried tomatoes (I teamed this with fresh basil)
1/2 cup chopped spinach (I teamed this with garlic)
1/2 cup sliced courgette (I teamed this with dried italian herbs and fresh rosemary)
Method:
Mix the dry ingredients together and set aside. Chop the onion finely and grate/process the cauliflower (to a rice like consistency) and add both to the dry mix, then add the water and mix through well.
If you are making mini quiches, separate the batter now.
Stir through your chosen additions (add flavours at the same time as the other ingredients in previous steps if more appropriate to do so)
The mixture should be thick and clumpy but easy to spoon into a tin. I used an 8” silicone cake tin, but you could also use a metal one with removable bottom, or large silicone muffin cups.
Press the mixture firmly into the pan but leave the top quite rough for some nice texture. Bake at 180C for approx 30 mins until the tops is nice and golden, or around 20 minutes for mini quiches (keep an eye on the colour).
Serve either hot or cold. This ‘quiche’ holds together really well when cold so would also be great for picnics/lunchboxes. It also freezes well and can be reheated in the oven.


Why not sign up for my newsletter in my sidebar where I feature roundups and special offers plus my FREE ebook. If you are new round here check out my 'About' and 'Getting Started' tabs up top. To buy nibbles you can also find me over at Wholeplus.
Day to day you can always find me hanging out in these places:
I've entered this recipe into the Health Bay Recipe Challenge because I reckon this hits the spot for both health and taste! What do you think?

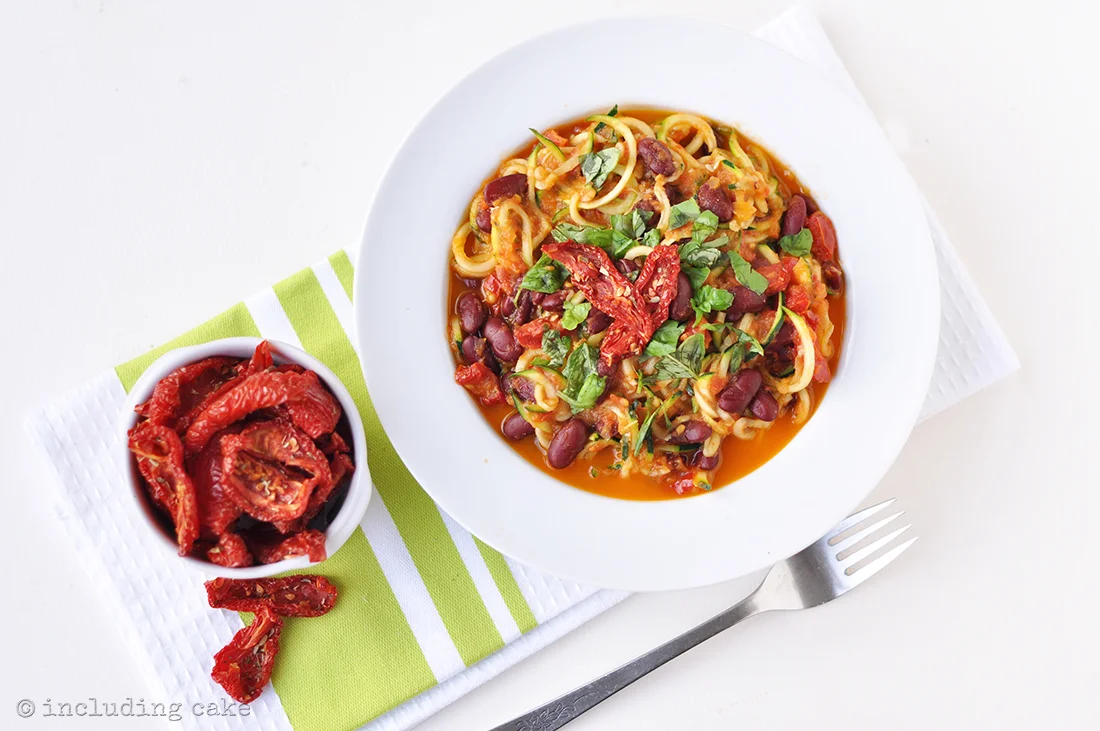
Double tomato courgetti spaghetti
Do you have more courgettes?
Well, if so here is another one for you as we hang onto the last of the summer with warm September days but with a little coziness thrown in the for the cooler evenings as the night draws in that little bit quicker.
I actually made this recipe in the height of summer but hadn't written it up on my computer. I happened to be going though some old notes and I found it, definitely one worth sharing with you today. The sundried tomatoes (or dehydrator in my case) really boost the flavour so if you don't want to make your own you can buy some to add.
I made this recipe when my spiralizer was still a novelty (actually it is still novelty!), but use a julienne peeler if you don't have a spiralizer to get nice thin strips of courgette. There would be no reason why a wheat, rice or bean based spaghetti would not be a great alternative. I actually have an awesome bean pasta recipe I want to share with you.... soon!
Tell me, what are your favourite summer to Autumn transition meals?

Recipe: Double tomato courgetti spaghetti
Serves 2
Ingredients
1 tin chopped tomatoes (or 4 large parboiled cooked chopped tomatoes)
2 cloves garlic
1 small onion- sliced
2 medium courgettes
1 can red kidney beans
few leaves fresh chopped basil
handful of sundried tomatoes*
Method
Pan fry the onion and garlic in a splash of oil for a few minutes until softened. Add the red kidney beans and the tomatoes and simmer for 5-7 minutes to warm through or make sure the tomatoes are broken down and pulpy if using fresh. Add a small handful of chopped dehydrated tomatoes for extra flavour, reserving a couple for the top.
Meanwhile spiralise the courgettes (or use a julienne peeler) and boil/steam for a few minutes until just tender, or serve raw if desired.
Chop some fresh basil leaves.
Serve the tomato mix over the courgetti and sprinkle the remaining dehydrated tomatoes and basil over the top.
Recipe: dehydrated tomatoes
Approx. approx 3 cups worth
Ingredients
Approx, 10 large tomatoes
2 tsp salt
2 tsp mixed Italian herbs
Method
Cut the tomatoes into quarters and scrape the seeds and pulpy bit out. (reserve for the sauce above if you wish)
Lay on lined dehydrator trays (or lined oven trays) and sprinkled with herbs and salt.
Dehydrate for 2 hours at 60C and then for a further 10-12 hours at 40C until preferred texture achieved.
If over baking, set oven to lowest temperature and bake for approx 2 hours- checking after an hour.


Why not sign up for my newsletter in my sidebar where I feature roundups and special offers plus my FREE ebook. If you are new round here check out my 'About' and 'Getting Started' tabs up top. To buy nibbles you can also find me over at Wholeplus.
Day to day you can always find me hanging out in these places:
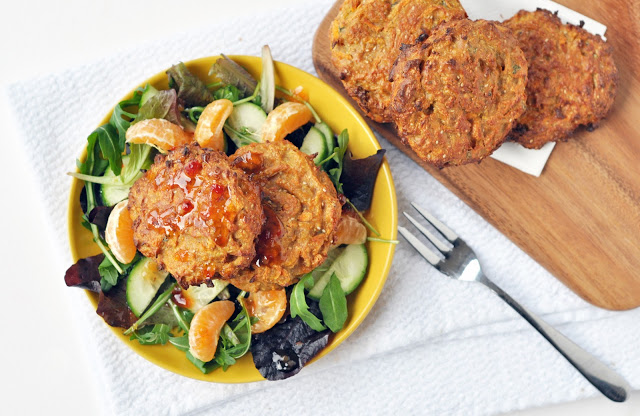
Sweet potato, orange and peanut rostis
Hot salads huh! yep, here's another one...well maybe not so much a hot salad as hot rosti topping. Delicious!!
I was inspired by Abel and Cole with this recipe, the original recipe can be found here, I tweaked it to make it gluten free and also oven baked the rostis instead of shallow frying them. They were the perfect texture with a lovely golden coat, so I really can't see how frying could have given a better burger!
This is the second time I have made these burgers and the first time round I also added an extra handful of crushed roasted peanuts as I happened to have some to hand that I'd just roasted, however I didn't have any ready roasted this time around...feel free to through a few in if you fancy!
My salad consisted of a bed of mixed leaves, rocket and cucumber, along with some clementine segments to emphasise the citrussy flavours. I drizzled a little sweet chilli sauce over the top (I admit that part is a little naughty...oops!)
This makes a great light lunch and even a pretty substantial main meal.
For more 'burger' recipes... check these out.
Recipe: Sweet potato orange and peanut rostis
Makes approx 8 rostis
Ingredients:
2 cups sweet potatoes
2 tbsp crunchy peanut butter
2 tbsp soy sauce
2 garlic cloves- crushed
½ tsp ground ginger (or 1 tsp fresh grated)
½ tsp chili flakes (more or less to taste)
2 tsp freshly grated orange
A handful of fresh coriander or basil, finely chopped
½ cup chickpea (gram) flour (or other GF flour)
1 tbs chia seeds or flax meal (optional for good measure for binding!)
Method:
Peel and halve the potatoes. Plunge into lightly salted boiling water for 5 mins. Drain and cool.
Meanwhile mix the peanut butter, soy sauce, garlic, chili, ginger and zest in a large bowl.
Coarsely grate the cooled sweet potato or squash into the mix. Add the fresh herbs, chia seeds or flax (if using) and chickpea flour and fold through until well mixed. Season to taste. The mixture should be sticky but firm enough to handle. Note: add more flour if too sticky or a little water or orange juice is too dry.
Spoon small handfuls of the mix to form patties on a flour dusted parchment lined baking sheet. Lightly glaze with a little oil if desired.
Bake at 180C for approx 25 minutes until golden. Flip over after 15 minutes.
These keep well in the fridge for a few days, I imagine they would also freeze well although I haven’t tried this.


Carrot burgers
These carrot burgers came about as a moment of spontaneity on my birthday evening last week. I shared these burgers for dinner with my mum, who proclaimed (after having eaten it all up) ‘oh I should have really cooked for you since it’s your birthday’, oh well….bit late now! Not that I minded, I think about food all day long and am always excited to try out something new when the idea strikes, this particular moment in time was no exception…birthday or not!
I’d had a pretty full on day…well, with the birthday cake under my belt (er, quite literally) I was in the mood for more of a light bite in the evening, so I served these burgers with salad and a simple tahini sauce. The perfect balmy summer dinner (balmy summer…I wish!) You could serve with a side of couscous for a more substantial meal.
The other great thing about these burgers is that they are pretty quick and simple to throw together and I’m pretty sure they could be frozen, although I haven’t tried. Add in your own favourite blend of spices, I used a cajun mix for a warm Mexican kick. I have also used red palm oil (as I like the deep yellow colour it gave to coat the burgers, but other oils would be absolutely fine. I like to add beans to things…most things, sweet or savoury! Beans or chickpeas give great texture, act as a binding ingredient and provide a good source of protein, so are a great base for many burgers.
If you have a thing for burgers, these recipes might also take your fancy:
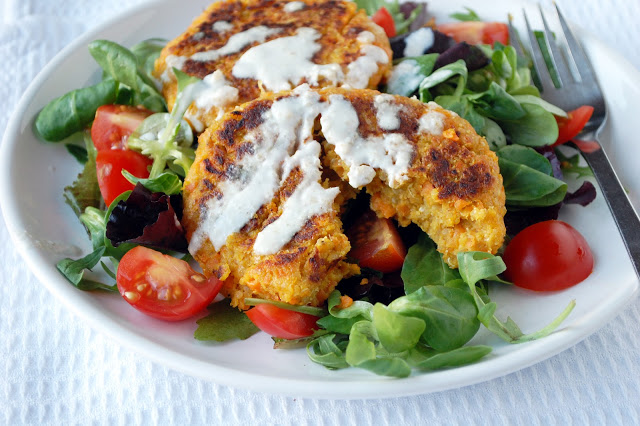
Recipe: Carrot burgers
Makes approx. 6 burgers (depending on size)
Ingredients- burgers
300g carrots
200g chickpeas
1 small onion
1 tbs tahini
1 tbs ‘spices’ (I used a Cajun mix)
Extra salt to taste
50g oatmeal
1 tbs chia or flax plus 2 tbs hot water
1 tbs red palm oil (or other oil) for frying
Ingredients- tahini sauce
50g yoghurt of choice (or cashew yoghurt as I used)
2 tsp tahini
2 tbs lemon juice
Method
Coarsely chop the carrot and onion in a food processor and then add the chickpeas, tahini and spices and roughly mash through. Transfer the mixture to a sauce pan and cook for approx. 10 minutes stirring frequently to prevent sticking.
Once cooked, stir through the oatmeal and gelled chia/flax mixture. The mixture should be sticky but firm, if too sticky add a little more oatmeal. With wet hands form flat burger patties and fry them in a lightly oiled pan for a few minutes on each side until golden.
For the tahini sauce, mix all ingredients together well in a small bowl.
Drizzle burgers with tahini sauce and serve immediately.

Black bean beet burgers
Chant the title of this recipe over and over and you’ll have yourself a rap…or something of that sort! Either way these burgers are worth the chant (and the wait for those of you saw the sneaky picture I posted on my Facebook page when I’d first made them a week or so ago)
I know I still have a few recipes to share from my birthday post, and also another birthday related recipe (who doesn’t like to keep birthday’s alive for as long as possible?) but for today, I didn’t want to make you wait any longer for these burgers that have been grinning at me from the folder of photos on my computer desk top for too long!
Black bean beet burgers… Black bean beet burgers… Black bean beet burgers… Black bean beet burgers… Black bean beet burgers…
So I figure the title of this post gives them away rather but apart from having a slight purple tinge, I think they look pretty authentic, complete with chargrilled lines and all. When I make these burgers again I may reduce the amount of beetroot slightly and also use a mix of cooked quinoa and rice for a variation in texture, since quinoa holds the firmness of the grain more so than rice which may be even more realistic for a meaty texture…just a couple of tiny thoughts to bear in mind, but here I have given you the recipe exactly as I made it. It goes without saying that you could make a big batch and freeze some. You could also form balls and make meatballs…another variation on this theme.
Typically I don’t seek to replicate ‘meat’ in my meals, I simply don’t feel the need to and a just don’t miss it. I love the taste and textures that veggies and non-meat foods provide without trying to replicate meat…but this was simply a challenge I could not ignore. Plus I wanted to see how authentic I could make these, particularly for non- veggie friends.
Another important side note to these burgers is that they are very ‘stable’ by that I mean they hold up very well to handling pre-cooking so I think they’d be great for a BBQ! I am definitely going to be making some of these this summer. I found that the most authentic colouration came from part oven baking and part pan frying in a griddle to obtain the best colour and charred lines. The first batch I just oven baked and they tasted great but just lacked a little something in the visual department… me…perfectionist…never!
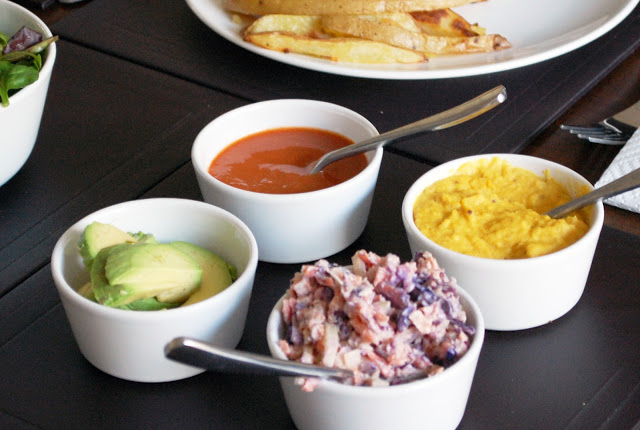
I teamed this meal with homemade tomato ketchup, cheezy mustard dip, avocado slices, and a homemade coleslaw. The burgers buns were simply baked versions of my gluten free flatbread with sesame sprinkled on top. Sweet potato fries sealed the deal! I have a recipe for the ketchup and cheezy mustard dip on the way soon….
Enjoy!

Recipe: Black bean beet burgers
Makes approx. 6 burgers
Ingredients
1 cup black beans- cooked
1 cup brown rice- cooked
1 cup oatmeal (GF if needed)
1 small onion- finely sliced
1/3 cup cooked beetroot- shredded finely
2 tbs chia and 3 tbs water
2tbs tahini
2 tbs tamari soy sauce
2 tsp mustard
Approx. ½ tsp hot chipoltle sauce (to taste)
1 tsp garlic powder
½ tsp chilli powder
½ tsp paprika
Method
Mash black beans and mix with all other ingredients until you have a well mixed but still textured (meaty) mixture. The mixture should be sticky but manageable.
Form into burger patties approx. 1.5cm thick using your hands or use a cookie cutter as a mould to achieve neat edges (perfectionist!). Lay the burgers on a lined baking sheet and bake for approx. 10 minutes until they are just beginning to brown and then fry on a griddle pan for a few minutes each side to complete the cooking and achieve seared pan lines.
Can be frozen.


This recipe was shared in Allergy Free Wednesday's
'Rawgust' is over and we are rolling swiftly into September!
I thought I'd take a moment on this sunny Sunday morning to reflect on a few thoughts of my 'raw food' experience. As I mentioned in my previous post I didn't maintain a 100% raw diet, it was more like 85% as my view was to see it as an exploration and open my mind to new recipes and ideas, rather than a restriction which I may have felt had I been super strict.