

Banana bread breakfast 'cupcake'
This is a very last minute post.... by that I mean, the idea for this banana bread breakfast cupcake came to me whilst I was walking back from my gym class and within 10 minutes of getting home I had made this little gem and was happily sitting down to a yummy post gym brunch munch.

Within the hour the photos had been edited, text written (erm...as I speak) and here we go. Why the rush? Well apparently it's National Cupcake Week, and whilst usually these foodie 'events' totally pass me by I actually became aware of this a couple of days ago and the idea popped into my cake for a twist on the 'cupcake' format itself, I love banana bread and it's always a crowd pleaser, so why not make a single serve banana bread cupcake! I've managed to sneak this in before the week was out- winner!! It's still a cup cake of sorts ok...maybe just not in quite the usual sense.
This is a perfect two-minute breakfast treat and I used a collection of very healthy breakfasty ingredients.... oats, seeds, banana, berries, fruit juice.... everything you might have for breakfast, just smooshed up in a mug (cup)!
It's sugar free if you use stevia as I haven't even used any of my beloved dates in this creation! Plus if you use gluten free oat flour it's gluten feee (other GF flours may also work here). You could add extra spices or different fruits to add your own twist. I also dolloped a blob of soy yogurt and a tiny blob of sugar free jam on top to make it more like dessert. Cheeky!
So there you have it... a moist, dense and cakey banana bread breakfast cupcake with toppings!
For all my other single serve recipes...you'll find them here!
This is also a classic 'Bressert' recipe... Bressert? A cross between breakfast and dessert. It's my favourite combo and I have a whole heap of bressert recipes here too!
Enjoy :-) P.s tag me if you make it- i'd love to see!

Recipe: Banana Bread Breakfast Cupcake
Ingredients:
1 small banana- mashed
3 tbs oat flour
3 tbs LSA (ground linseed, sunflower seed, almond) you could just sub ground almonds here.
1/2 tsp baking powder
1/4 tsp baking soda
3 tbs fruit juice of choice
4 drops pure stevia liquid (or 1-2 tsp syrup of choice to taste)
handful of berries- for topping
optional: spices, yoghurt, drizzle, toppings...
Method:
Mash the banana in a small bowl and add all remaining ingredients to it. Mix well to form a smooth thick batter and spoon into a microwaveable cup or mug. Lightly press the berries into the top last.
Microwave on high for 1 minute, the top should be firm to touch but it should be soft, moist and cakey at the bottom. Add extra toppings if desired and serve directly in the cup.


Want to check out more refined sugar free healthy recipes all in one place! Have a look at my 'Sugar Free Satisfaction' Recipe Ebook. The perfect companion to a lifestyle free of refined sugar with 30 incredible recipes and top tips for sugar-free living day to day.
Carrot and lentil soup
I am going through a bit of a lentil phase at the moment, and have been creating all things lentilly. Lentils are a classic soup base and here I have opted for two different types.

Orange and yellow was the generally look I was going for.... enter the carrots! When I first made this soup in a 4-portion batch as I usually do, I served it without the corn- hence the photos are ‘corn-less’, but the next day as I filled a flask of soup for a lunch, the leftover tub of sweet corn in the fridge caught my eye and on a whim I added it to the mix. It was even better this way, the juicy sweet kernels of corn really add to both the texture and flavour of the soup. So whilst I have added it as an optional ingredient in the recipe, I would encourage you to do so!
You can find more soup recipes to warm you up here!
For those who saw and commented on this picture on my Instagram and Facebook a few days ago... I will try and recreate the recipe for you and post it very soon!

Recipe: Carrot lentil soup
Serves 3-4
Ingredients
- 1 large onion
- 1 tbs coconut oil or red palm oil (I used red palm oil to keep an extra orangey colouring)
- 2 crushed garlic cloves
- 1 tsp dried cumin seeds
- ½ tsp dried coriander (or fresh if preferred)
- 3 grated carrots
- 1 cup dried red lentils
- 2 tbs soy sauce
- ½ cup green lentils
- 3 ½ cups veg stock (more if needed)
- 1 cup sweetcorn- optional
Method
Saute the onion and garlic in the oil for 5 minutes until softened.
Add the spices and grated carrot and sauté for 2-3 more minutes.
Add all remaining ingredients and bring to the bill before simmering for approx 20 mins until the lentil are cooked.

CADA...zing!
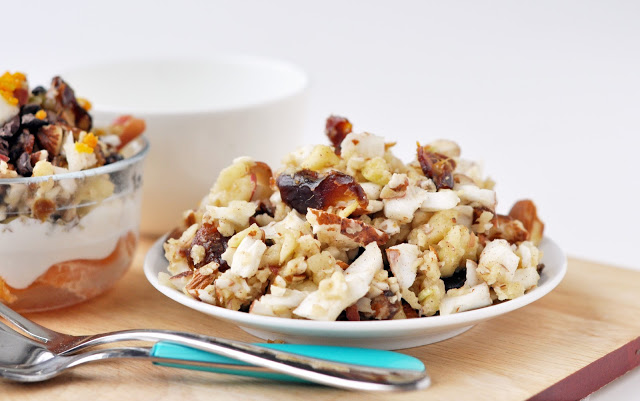
This recipe is not my own discovery. In the world of Thermomix users it’s a well known concoction, with each of the initials corresponding to each of the ingredients. I decided to add some ‘zing’ with orange, cinnamon and cacao nibs and turned it into a creamy breakfast yoghurt bowl!
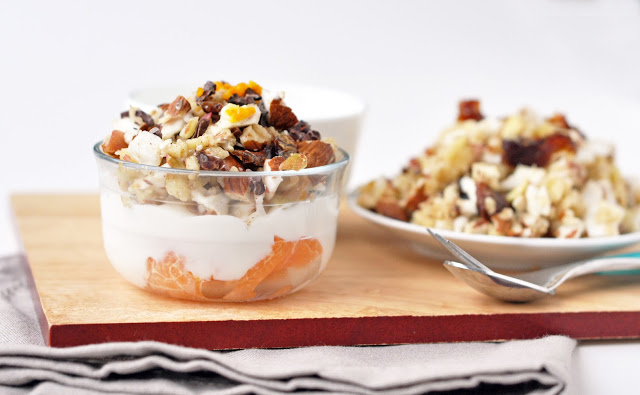
This is a super simple recipe. Great for breakfast or as a refreshing but filling snack. Like most of my favourite recipes this one is endlessly versatile...change up the nuts and fruits to suit your taste or what you have to hand. The fresh coconut is a must, and this is one of the only recipes I keep fresh coconut to hand for. I also use dates for their versatility and subtle sweetness but other dried fruits could be used.
I think what I actually love most about this recipe is it’s ‘what you see is what you get’ philosohy. All the ingredients are still visible in their original form, blitzed a little and mixed. Keep it nice and chunky for great texture.

Recipe: CADA...zing!
Serves 2
Ingredients
Approx. ¼ cup chunks of fresh coconut
1 small apple- quartered and cored*
4-5 small dates (I used deglet nor)
¼ cup whole almonds
Optional extras…
1 small orange
½ cup vegan yoghurt
1 tsp orange zest
Cacao nibs
Cinnamon
Method
Prepare the CADA ingredients and add to the Thermomix bowl, or other high power food processor and pulse together until chunky.
To serve, layer up the orange segments into the bottom of a small bowl, top with yoghurt, add the CADA mix and then garnish with zest, cacao nibs and cinnamon as desired.
*add a splash of fresh lemon if not serving immediately to prevent from browning. CADA mix will store in the fridge for a few days.

Crispy polenta crackers
I found myself in a polenta frame of mind this morning, triggered by this chocolate shortbread, of which there is now a gluten free version…recipe coming soon! It had been so so long since I’d made that shortbread, and I’d forgotten has delicately crisp and crumbly it was.
Anyway back to the polenta. There it sat in it packet on the kitchen worktop, waiting to be buried back inside my baking box, until another recipe then popped into my mind. Another recipe I’d first tried out months and months ago, and I seem to remember at the time the Boy had said, ‘Mmmm, this tastes like pork crackling’!
Er, well I didn’t think it tasted like crackling so don’t worry. But I do understand what he meant…these crackers are super duper crispy, you’d think they’d been deep fried to get that intense crunch, but nope they are simply baked.
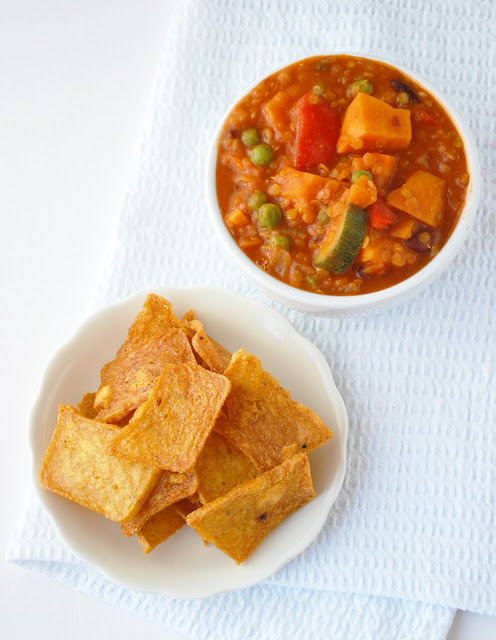
The healthy way to a dipping chip!
The key is to slice the polenta as thinly as possible and then bake the slices on a lower heat for longer, and then double bake for extra crispiness. You can mix up the seasonings however you wish. I went for a slightly Mexican theme as I teamed these with my veggie chilli.

Recipe: Crispy Polenta Crackers
Makes one bowlful
Ingredients
- ½ cup instant polenta
- 2 cups water
- 2 tbs nutritional yeast
- 1 tsp cajun spice mix (chilli, garlic etc)
- ¼ tsp salt
Method
In a sauce pan mix polenta with water, add remaining ingredients and simmer for approx. 5 minutes stirring continuously until mixture begins to thicken but is still pourable.
Pour/spoon into a small loaf tin, smoothing the top as much as possible and allow to set then firm up in the fridge.
Once set firmly, remove the polenta loaf from the tin and using a sharp knife slice as thinly as possible, laying each slice on a greased/lined baking sheet
Bake at 150C for approx. 20-30 mins depending on the thickness of the slices. If the slices are not yet crispy in the centre but the edges are done, allow to cool and then re-bake for a further 10 minutes or as long as necessary.


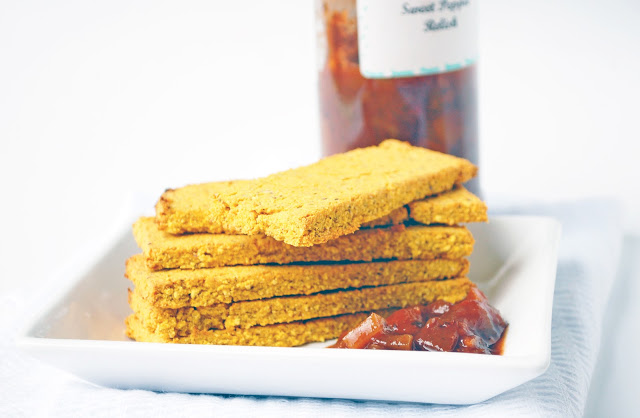
Cheezy vegan crackerbread
Recently I’ve been testing out some new ingredients courtesy of Real Food Source, and this little recipe was a great way to do so.
The main ‘new thing’ for me is red palm oil, there are loads of links to shops and resources out there, but for further reading I came across this article. Red palm oil has a very strong deep yellow/orange colour and a distinctive savoury taste that’s hard to describe, I would suggest using this for savoury foods instead of sweet unless you have a very strong dominant sweet flavour such a chocolate or spices. It can be used in place of coconut (or other oils of choice) and has amazing health properties in part due to its rich red hue which is rich in carotenes.

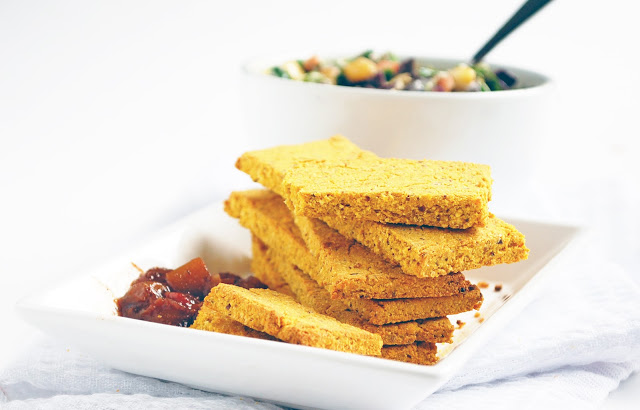
I really wanted to exploit its colour and so a ‘cheezy’ recipe seemed the obvious answer. Teamed up with nutritional yeast and some spices… these little dipping crackers have a lovely mild and nutty cheesy flavour, perfect served with a dip, relish or chutney. I also went one step further and made a cheezy roll using a combination of salsa, sundried tomatoes and fresh and dried herbs spread across the rolled out dough, and the wrapped this up into a roll. If you do this be careful as the dough is quite fragile and will also expand as it cooks so it is likely to will get cracks across the surface of the roll. The sundried tomatoes tasted amazing in this combination so you may like to simple roll some chopped sundried tomatoes onto the surface of the dough, score into slices and then bake as slices instead of rolling it up.
As you can see from the photos, these crackers are soft and more like a dense bread slice than crisp crackers. I have used coarse coconut flour here, but regular coconut flour (or other GF grains) should work although it may alter the texture, I haven’t tried this. You could also sub part polenta meal if using regular coconut flour as this should assist with creating a grainy texture if desired. The recipe itself is ideal as a basis for experimenting with alternative types of flour and oils. If you give it a go let me know how you get on.
Recipe: Cheezy crackerbread
Makes approx. 7 strips (or double the recipe and roll into a pinwheel)
Ingredients
- ¼ cup coarse coconut flour
- ¼ cup fine almond flour
- ¼ tsp baking powder
- 3tbs nutritional yeast
- ¼ tsp salt
- Pinch garlic powder
- Pinch mustard powder
- 2 tbs red palm oil- melted
- 2 tbs ground chia plus 5 tbs hot water
- 1 tbs sesame seeds (optional)
Method
Mix the dry ingredients together in a medium bowl then add the wet ingredients and mix well to form a dough. The dough should be neither too crumbly nor too sticky to roll out on a piece of baking parchment. The dough may crack as it is rolled, but just aim to get as even a sheet as possible.
Slice the rolled dough into inch thick strips and bake at 180C for approx. 10 mins until golden at the edges. Allow to cool before serving.
Great served with a dip, relish or chutney.

Broccoli and Cannellini ‘Get well soon’ Soup
I’m an invalid. I’m rubbish at being a poorly person as I’m just no good at sitting still and doing nothing. But sometimes your body simply has other ideas.
I appear to have a trapped nerve behind my shoulder which has sent awful aches, pains and numbness all down my left arm. Try as I might to simply ‘carry on as usual’ it just isn’t happening and so for the last three days I’ve pretty much been stuck in bed and catching up with bits and pieces on my laptop as much as I feel able!
Yesterday evening I did manage to make it in to the kitchen to concoct some soup with the help of my trusty Thermomix. I made a big batch so that I could have the left overs today…good job really as I feel worse today (typing parts of this blog post one handed!) and so don’t think I could have managed anything much today. I struggled enough just to take these few photos- I wasn't going to give in!
My dinner companion yesterday proclaimed that this soup tastes like ‘chicken soup without the chicken’ and since chicken soup is supposed to be the heal-all wonder…well the ‘get well’ title seemed entirely appropriate…whether you think it tastes like chicken soup is another matter. I think I just tastes like 'simple goodness'- delicate, wholesome and nourishing, and with some added pasta or quinoa (I served it with quinoa yesterday) you have yourself a good meal, Invalid or not!
I had so many plans in the kitchen this weekend, not least because I have a little stall at an event next weekend (more on all that soon) that I needed to get preparations underway for. Fingers crossed I am back in the saddle very soon. In the meantime, with only my laptop for company, I have been organising my recipes into more easily searchable categories, hopefully I’ll get that up later once the next dose of painkillers kick in!

Recipe: broccoli and cannellini soup
Serves 4
Ingredients
- 1tbs olive oil
- 1 onion finely chopped
- 4 cloves garlic crushed
- 1 tsp dried mixed herbs
- Few leaves fresh rosemary
- 400g (approx. two small heads) broccoli- chopped into fairly small pieces
- 100g (approx.½) courgette- grated (optional)
- 400g can butter beans/cannelli beans
- 800ml hot vegetable stock
- 100g quinoa or small cooked pasta shapes- optional
- Salt and pepper to taste
Method
Heat oil in a large saucepan and gently fry the onions and chopped garlic for around 5 minutes until soft.
Add the herbs and broccoli and cook for 5 minutes, stirring frequently. Add all remaining ingredients (other than quinoa/pasta if using) and simmer for a further 10 minutes or until broccoli is cooked.
The quinoa/pasta can be cooked separately and spooned over to serve, or added to the pan during cooking time as appropriate.


Roasted chickpea 'croutons'
I had come across numerous recipes for roasted chickpeas but I’d never had a go myself until now. The principle is so simple…..get your cooked chickpeas (I cook mine from dried in big batches and then freeze them until needed), add seasoning, roast until crisp and golden.

The perfect alternative to popcorn for a night in with a DVD, a handy snack alternative to roasted nuts or even sprinkled over a salad for a crispy bite offering a GF alternative to crispy bread croutons. You can vary the seasonings as you wish. I went for an Indian theme for my first batch and then through in a few Italian spices and a little tomato paste for a lovely crunchy salad topper. I would really recommend the salad topper as a really quirky alternative to croutons as the texture is great!
The chickpeas will keep for a few days if stored in an airtight container so you’ll have plenty of snack options to hand. I haven’t yet tried freezing these but I imagine that would also work well.
The spice combinations below are just examples of what I went for so feel free to through in whatever you choose!

Recipe: Roasted chickpea Croutons
Makes one bowl
Ingredients Indian:
- 1 tsp chili powder
- 1 tsp ground cumin
- 1 tsp garam masala
- ¼ tsp garlic powder
- ½ tsp sea salt
- 1 tbs ground flax or chia seeds
- 1 tbs fresh lemon juice
- 1 tbs red palm oil or olive oil
- 1 tsp agave nectar (optional)
- 200g cooked drained chickpeas
Ingredients Italian:
- 1 tsp chili powder
- 1 tsp mixed Italian herbs
- ¼ tsp onion powder
- ¼ tsp garlic powder
- ½ tsp sea salt
- 1 tbs ground flax or chia seeds
- 1 tbs fresh lemon juice
- 1 tbs red palm oil or olive oil
- 1 tbs tomato puree
- 200g cooked drained chickpeas
Method:
Preheat oven to 200C. In a medium bowl all the ingredients and mix well adding the chickpeas last.
Place the seasoned chickpeas in a single layer on a greased or parchment lined baking shee. Bake for 25-30 minutes, stirring once during cooking, until chickpeas are slightly crispy.


Apple cookie pie for breakfast
This may actually be the most delicious breakfast I have ever made…or maybe even ever tasted. The fact that is so simple and good for you too is a bonus! It would make a yummy dessert too!
You have to try it out…and I hardly ever say that about a recipe! (even though I usually think it!)
See, the exclamation marks are out in force again today so this really is something special!!!! Ha!
Ok, ok, I’ve calmed down a little now…breathe. I woke up on Monday morning and with it being a bank holiday and a lovely change from the norm, I wanted to make myself a little something special, but I had no idea what. I did debate breakfast of the pancake or granola variety but it just wasn’t doing it for me.
Then a brainwave crept over me and I had to give it a shot. What if I made two oaty breakfast cookies to sandwich a hot, rich and fruit filling? It had to work...right?
Oh yes it did, it was so good and so quick. I don’t like to hang about when I’m hungry and this most certainly did the job. With endless variations on the theme for both the ‘crust’ and the filling you can play around with the ingredients to your heart’s content. I kept the crust quite plain this time so that fruity filling coated in a sweet peanut buttery sauce could take centre stage, but by all means go ahead and jazz up your crust too! I used both an apple and a nectarine (as I had a nectarine that looked like it needed using up) but just the apple and maybe some raisins for an extra juicy texture would also be fabulous.

Recipe: Apple cookie-pie
Serves 1
Ingredients- cookies:
- 1/3 cup oats
- 3 tbs buckwheat flour (other flours would probably be fine too)
- ¼ tsp baking powder
- 1 tbs ground flax
- Ground cinnamon and vanilla extract to taste (approx. ½ tsp each)
- 1 tbs agave
- 3-4 tbs soy yoghurt (or regular yoghurt for non vegan)
- Walnut pieces to decorate- optional
Ingredients- filling:
- 1 small apple
- 1 small nectarine or two apricots (or omit and use 1 large apple)
- 1 tbs peanut butter
- 1 tsp ground flax
- 1 tsp agave (if necessary)
Method
Mix and mash all the cookie ingredients together well to form a thick sticky ball of dough. Divide into two and flatten the ball with wet palms and place both on a microwaveable plate. Decorate one cookie with walnut pieces.
Cook on full powder in the microwave for 1 min 20s. Press with your finger and if there are no visibly sticky bits you’re done.
Whilst the cookies are cooking, chop the fruit into 1-2 cm sized chunks. Place the apple in a microwaveable bowl and cook in the microwave for 1 min Add the remaining ingredients and cook for a further 1 minutes. Mix to coat evenly.
Set out one cookie as a base and pile on the filing, adding the other cookie as a top crust. Dust with cinnamon if desired. Serve immediately.


I am a designer, personal empowerment coach and writer from the UK. I work with health and wellness businesses to bring their mission and purpose to the world. I also help people become the best version of themselves in mind and body.
Sign up here for my content delivered to your inbox and get access to my free resources.
Day to day you can always find me hanging out here:
Instagram ✨ Facebook ✨ Pinterest